You pull a record from the sleeve, drop the needle, and wait for that first warm hit of bass. Instead, you get crackle, static, and the faint sound of years of bad storage coming back to haunt you. If you buy second-hand vinyl, DJ with older pressings, or keep a collection in a London flat where dust gets everywhere, this happens more often than is often admitted.
That’s why knowing how to clean vinyl records at home matters. Not as a fussy collector’s ritual, and not as something you only do when a record looks filthy. It’s basic maintenance. If you want records to sound right at home, hold up under regular play, and stay usable for future sets, cleaning has to become part of the routine.
Why Pristine Vinyl Matters More Than Ever
You hear the truth about a record the moment it hits a club system. A copy that seemed fine at home can suddenly spit crackle through the tops, smear the kick, and make a great pressing sound tired. For DJs, that is not a small flaw. It changes how the room feels.
Vinyl has pushed well beyond collector nostalgia, and more new owners are now running into the maintenance side of the format after the first few purchases. Buying the record is the easy bit. Keeping grooves clean enough to track properly, sound right, and last through regular play takes a routine.
The awkward part is that dirt does not always look dramatic. I have bought records from shops, fairs, and private collections across London and Kent that looked spotless under normal light, then opened up with pops, haze, and groove noise the second the stylus got involved. Dust is only part of it. Old smoke residue, fingerprint oils, paper scuffs from cheap inner sleeves, and storage grime from lofts or damp cupboards all leave their mark.
Clean records sound better and last longer
Every play drags the stylus through whatever is sitting in the groove. If that groove is carrying grit or sticky residue, playback suffers and wear adds up faster than it should. The record sounds worse. The stylus has a harder job as well.
This matters even more with older 12-inches. A battered chart LP can usually be replaced. A clean original house, soul, disco, or boogie cut with the right mix on it often cannot, at least not without paying far more next time.
A clean record gives you an honest read on the pressing. A dirty one can make you blame the mix, the cut, or the system for faults that are really just muck in the groove.
Used vinyl is where this becomes a real habit rather than a nice idea. Second-hand copies often come with a history you can hear. Dust from old shelves, nicotine film, fingerprints round the edge, and general crate grime are all common, especially if you buy regularly around London markets, record fairs, or smaller Kent shops where stock has passed through plenty of hands.
There is also a professional standard to it. If a record is going anywhere near a club bag, it should be cleaned first. That applies whether it cost fifty quid from a specialist dealer or a fiver from a basement bin. Presentation matters too, and that same care for the full experience is part of the culture captured in this personal, legendary event aesthetic.
Clean vinyl gives you fewer nasty surprises. Better cueing. Cleaner transients. Less groove noise masking detail. More confidence when the needle drops in front of a room full of people.
The Every-Play Ritual for Dust and Static
You pull a record from the sleeve ten minutes before set time, cue it up, and the first thing out of the speakers is crackle. Not groove wear. Dust and static. That is why the pre-play brush is part of the job, especially if you are hauling records across London, playing dry heated rooms in winter, or buying second-hand stock around Kent that has sat in paper sleeves for years.
The biggest day-to-day gain comes from a simple dry clean before the needle goes down. No fluids. No kitchen-sink routine. Just a proper anti-static brush used the same way every time. As noted earlier, dry cleaning before each play is the habit that keeps loose dust from being ground further into the groove.
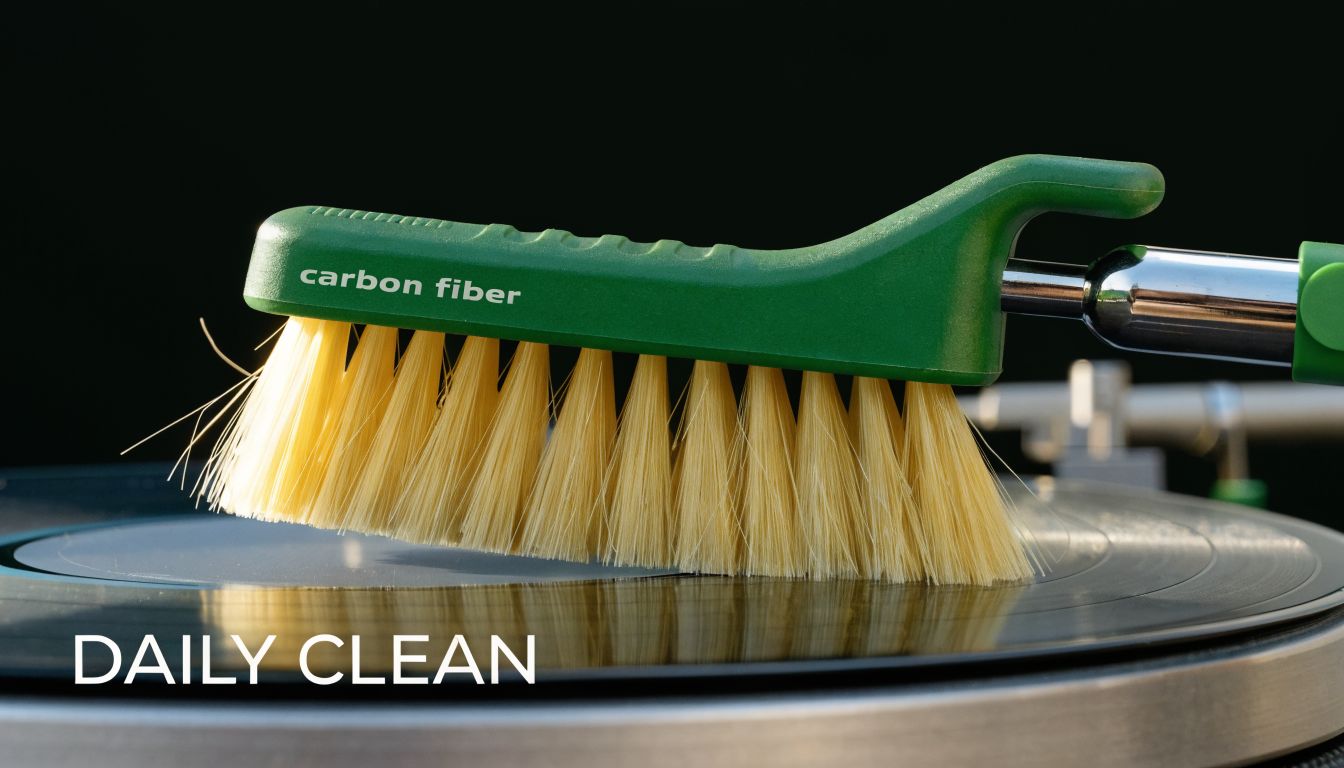
What a carbon fibre brush does
A proper carbon fibre brush handles two problems at once. It lifts the loose surface rubbish you can’t always see, and it helps discharge the static that makes a clean side pull dust straight back in. That second part matters more than many home guides let on. In a booth, static is often the reason a record looks dusty again seconds after you cleaned it.
Carbon fibre is my usual choice for gig prep because it is quick, easy to keep by the decks, and better suited to frequent use than overcomplicated dry tools. Velvet pads can work, but they need to be clean and used with a bit more care. If the pad is loaded with grime, it smears rather than lifts.
Use the brush like this:
- Start the platter spinning at normal speed.
- Lay the brush lightly across the grooves so the fibres sit square to the record’s path.
- Use very light pressure and let the fibres catch the dust.
- Hold it steady for two or three rotations so debris collects along the leading edge.
- Draw the dust toward the outer edge in one smooth movement.
- Clean the brush before the next side so yesterday’s dirt does not go back on today’s record.
That whole routine takes a few seconds. It saves far more time than it costs.
Common mistakes that make things worse
The usual errors are easy to spot at fairs, in shops, and in other DJs’ booths. Too much pressure. Random hand movements. Dirty tools.
Here’s what causes trouble:
- Pressing hard: This can grind grit into the groove instead of lifting it off.
- Brushing across the groove pattern at an angle: Dust gets pushed around rather than gathered.
- Quick dabs in the middle of the record: One tap does nothing useful.
- Ignoring the brush itself: A filthy brush just recycles old debris.
- Using a dry brush on sticky residue or fingerprints: That needs a wet clean, not more brushing.
Practical rule: If you can hear crackle in the lead-in and see a line of dust on the stylus after one pass, your brushing needs work.
The sound difference shows up fast
A record that has been brushed properly usually cues more cleanly, tracks with less fuss, and gives you a truer sense of what the pressing sounds like. That matters in a club. You need to know whether you are hearing a noisy cut, a tired copy, or just muck that should never have reached the stylus.
Keep the brush where your hand already goes, beside the decks and mixer, the same way a tidy DJ booth setup built for fast, disciplined play keeps everything else within reach. Do it before every side. That is the habit that keeps a collection playable and a set dependable.
The Art of the Manual Wet Clean
You get home from a gig in Peckham, pull a bargain-bin twelve out of the bag, and under the kitchen light you spot finger grease, old sleeve dust, and that dull film that tells you a dry brush will not sort it. That is the moment for a proper manual wet clean.
Used well, wet cleaning brings a tired record back into fighting shape for the next set. Used too often, or with the wrong mix and too much pressure, it leaves residue behind and creates more work. For DJ use, the rule is simple. Wet clean records that show grime, sound clogged, or came from questionable storage. Leave already-clean copies alone.
Set up properly before the vinyl leaves the sleeve
Good cleaning starts with the surface, not the fluid. I use a stable, clean base, good overhead light, and tools laid out in reach before the record comes out. That cuts down fumbling, which is how labels get splashed and clean grooves pick up fresh fingerprints.
Keep the setup simple:
- A flat, lint-free support: A spare platter, cork mat, or clean microfibre-covered surface works well.
- Two cloths, not one: One to spread and loosen dirt, one to lift it away.
- A record brush: Use it first so loose grit does not turn into slurry.
- Fresh cleaning fluid: Mix a small amount for the job at hand rather than keeping a mystery bottle for months.
- Dry hands: Gloves are optional. Clean, dry fingers on the edges are enough.
For a straightforward home mix, distilled water with a small proportion of isopropyl alcohol is common practice. Keep it light, keep it off the label, and do not soak the record. If you are curious about other home cleaning methods, including ultrasonic options, Household Ultrasonic Cleaners gives a useful overview.
A visual demo can help if you prefer to watch the motion before trying it yourself.
How to clean it without grinding muck deeper into the grooves
The aim is to loosen contamination and lift it away in one controlled pass. Rushed scrubbing is what causes trouble.
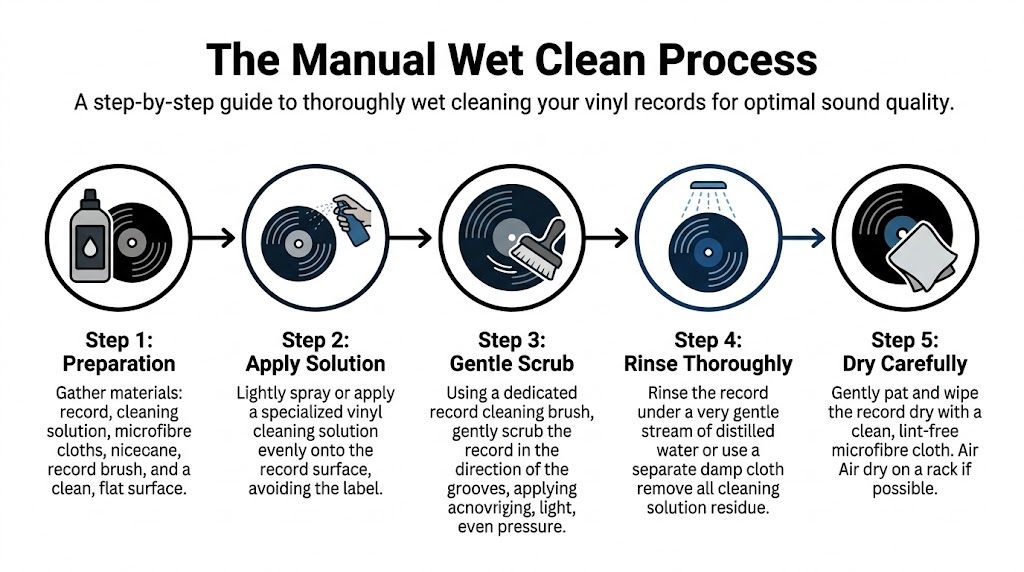
Use this sequence:
-
Dry brush the side first
Clear loose dust before any liquid goes down. -
Apply fluid sparingly
Lightly dampen the playing surface. A few drops spread across the side is enough for most records. -
Follow the groove path
Work in smooth circular motions with very light pressure. Let the cloth and fluid do the job. -
Lift off the dirty fluid
Use the second cloth to remove what you have loosened. Do not keep pushing the same damp cloth around the record. -
Rinse if the side was filthy
A careful pass with distilled water helps remove leftover cleaner from second-hand records with heavy residue. -
Air-dry fully before play or storage
Give it time. A damp record in a sleeve is asking for trouble.
What separates a decent result from a messy one
Pressure is the first problem. DJs in London often clean in batches before a weekend, and that is where standards slip. If you bear down to speed things up, you drag grit through the groove wall instead of lifting it free.
The next issue is using the wrong cloth. Cheap microfibre that sheds, old T-shirts with fabric softener on them, and kitchen roll all leave something behind. Use clean cloths you trust and retire them once they start holding dirt.
Fluid choice matters too. A mild mix is safer than a strong one, especially on older records and anything with delicate labels. If I am dealing with a valuable soul 45 or an irreplaceable house promo, I would rather do one careful clean, let it dry, play-test it, and stop there than keep going just because a mark is still visible.
Here is the quick call:
| Situation | Best move |
|---|---|
| Light dust before play | Stick to the every-play dry brush |
| Fingerprints, sleeve residue, visible film | Manual wet clean |
| Freshly bought second-hand record from a fair or shop | Manual wet clean before it joins the shelves |
| Record cleaned recently and playing quietly | Leave it alone |
| Deep, stubborn grime after one careful wet clean | Stop repeating the process and consider machine cleaning |
The manual clean that actually works
A proper wet clean should feel controlled and slightly dull. That is a good sign. No heroic scrubbing, no flooding, no trying to make a forty-year-old charity shop find look factory fresh in ten minutes.
The win is practical. Cleaner cueing, less stylus build-up, and a better read on what the record really sounds like. For working DJs around London and Kent, that matters more than perfection. You need records that play cleanly under pressure, not records that have been fussed over to death.
Manual Cleaning vs Record Cleaning Machines
Saturday afternoon, you are sorting a bag of used 12-inches picked up after a run through Soho, Camden, or a Kent record fair, and half of them need more than a quick brush before they go anywhere near a club stylus. That is the point where the hand-clean versus machine-clean question stops being theoretical.
Both methods have a place. The right choice depends on how many records you are cleaning, how dirty they are, and whether those records need to survive quiet home listening or a loud rig in a booth with no mercy for groove noise.
As noted in the Rough Trade vinyl cleaning and restoration guide, vacuum record cleaning machines have been part of serious home vinyl care for decades and are widely seen as the strongest option for pulling contamination out of the groove. That matches what I have heard in real-world DJ use. A careful manual clean can get a record playable. A good vacuum machine usually gets it cleaner, drier, and more consistent from side to side.
Who should stick with manual cleaning
Manual cleaning still makes sense for plenty of collections, especially if you buy mostly clean modern pressings and only tackle the occasional second-hand find.
It suits you if:
- You clean small batches: Three or four records at a time is manageable by hand.
- You buy mostly new vinyl: New records still need attention now and then, but usually not heavy restoration.
- You have limited space: Plenty of London flats do not have room for another bit of kit.
- You are still learning what dirt looks and sounds like: Hand cleaning teaches that quickly.
The trade-off is time and consistency. On your tenth record of the evening, it is easy to rush a side, over-wet a cloth, or miss residue sitting deep in the lead-in groove. For a home listener, that may be acceptable. For a working DJ packing a bag for a set, it gets old fast.
Who should seriously consider a machine
A machine starts to earn its keep when records are part of your weekly workflow, not an occasional hobby job.
A vacuum machine is a sensible buy if:
- You DJ regularly: Club systems expose every bit of crackle and grime.
- You buy used vinyl every week: Shop stock, market finds, and private collections often need proper extraction, not just surface wiping.
- You prep records for gigs: Faster turnaround matters when you are cleaning a stack before Friday night.
- You hold valuable or hard-to-replace pressings: Better fluid removal means less guesswork and less chance of leaving residue behind.
If cleaning sessions have started to feel like a chore that delays actual listening or gig prep, the machine is solving a real problem.
The trade-offs in plain terms
Here is the honest comparison.
| Factor | Manual wet clean | Vacuum cleaning machine |
|---|---|---|
| Upfront cost | Low | Higher |
| Storage space | Minimal | Needs dedicated room or shelf space |
| Speed per record | Slower | Faster once set up |
| Consistency | Depends heavily on technique | More repeatable |
| Drying time | Longer | Shorter |
| Best for | Smaller collections, lighter cleaning, newer vinyl | DJs, frequent second-hand buyers, bigger collections |
Some DJs also look at ultrasonic systems before buying a vacuum unit. If you are comparing cleaning methods more broadly, this overview of Household Ultrasonic Cleaners is useful for weighing the appeal against the practical drawbacks.
What I’d recommend in real life
Start by mastering manual cleaning if your collection is still under control. It is cheaper, it teaches good habits, and it is enough for a lot of records.
Buy a machine when the maths changes. If you are bringing home used wax around London every week, cleaning for gigs, or losing whole evenings to pre-play prep, a vacuum machine is not overkill. It is efficient, repeatable, and far kinder to your patience.
Rescuing Your Vinyl from Common Disasters
You get home from a market run in London, crack open a promising white label, and find fingerprints, a musty sleeve, and a slight dish warp. That is the moment that separates careful DJs from people who ruin records in a panic. Rescue work is slower than routine cleaning, and the first job is diagnosis.
A greasy fingerprint, mildew from damp storage, and groove wear can all produce noise, but they do not respond to the same treatment. Get that wrong and you can grind contamination deeper into the groove, or waste time chasing damage that is already permanent.
Fingerprints and oily residue
This is the problem I see most on second-hand 12-inches and records that have done the rounds at parties or in badly run shops. Finger oil does more than look messy. It holds dust in place and often shows up as crackle in the same few bars every play.
Use a measured approach:
- Remove loose dust first: A dry carbon brush stops you turning grit into an abrasive paste.
- Apply a small amount of cleaning fluid: Enough to break down the oil, not flood the label area.
- Work with the groove: Light pressure wins here.
- Use a separate dry cloth for the final pass: One cloth for fluid, one for lift-off.
If the mark is still there after one proper clean, stop. Under a strong lamp, many “stains” turn out to be groove scuffing or wear from a mistracking stylus. No amount of extra rubbing fixes that.
Records pulled from damp storage
Kent lofts, garages, and lockups are hard on vinyl. The record may survive. The sleeve often does not.
If a disc comes out of a musty inner, separate the record from all packaging straight away. Clean the vinyl on its own, bin any sleeve that smells mouldy or feels soft, and do not put the record back into the same paper after you have saved it. Anyone keeping parts of a collection off-site should read what items need climate-controlled storage, because damp and temperature swings are behind a lot of the rescue jobs I get asked about.
Keep the process simple:
- Remove the contaminated inner sleeve
- Lift loose debris before any wet cleaning
- Clean the record carefully, without soaking it
- Let it dry fully in a clean spot
- Re-sleeve only in a fresh anti-static inner
Heavy staining is often cosmetic. Active mould or residue in the groove is the primary concern. The aim is to stabilise the record and make it playable, not force it to look factory fresh.
For DJs who want to keep a trusted reference point handy in the studio, I often tell people to bookmark the VinylGold record care guide asset with the rest of their cleaning notes.
Warped records need patience
Warped vinyl tempts people into bad ideas fast. Hairdryers, radiators, hot water, windowsills. I have seen all of them used, and I have seen good records turned into ornaments.
For mild warps only, guidance noted in this Instructables record-cleaning article suggests a cautious method using controlled warm water, around 35 to 40°C, followed by flat weighting for a day or two. The key word is cautious. Warm, controlled, and evenly supported is one thing. Heat and guesswork is another.
Use these checks before you try anything:
- Look at the record on a flat platter first: Minor edge lift is different from a serious dish warp.
- Keep water warm, never hot: Extra heat can set a worse shape.
- Support the whole record evenly during weighting: Pressure on one area can leave you with a new problem.
- Accept limits: Some warps are playable. Some are not worth forcing.
If the record is rare or expensive, I would rather live with a mild warp than risk a home fix that makes cueing impossible in the booth.
Club-played and heavily contaminated records
Club records age differently from home-listening copies. They pick up bag dust, smoke film, finger grease around the edge, and whatever is living on a booth shelf at 2 a.m. Sometimes the grooves look fine but the playback sounds splashy, flat, or full of low-level crackle.
For those records, work in stages:
- Dry brush first to clear the loose layer
- Apply a pH-neutral fluid and give it a short dwell time
- Lift contamination with a proper microfibre or vacuum pass
- Rinse with distilled water if residue remains
- Inspect under light before deciding on a second pass
Experience proves critical. Some battered DJ copies improve dramatically with one disciplined clean. Others are worn from years of back-cueing and heavy tracking force. Dirt is fixable. Groove damage is not.
What not to do in a panic
Bad rescue attempts usually cause more harm than the original problem.
Avoid these:
- Household spray cleaners
- Hard scrubbing with pressure
- Very hot water on warped vinyl
- Several wet cleans in one sitting
- Putting a rescued record back into a dirty sleeve
Restraint keeps records alive. If you can get a noisy copy cleaner, flatter, and safer for the stylus, that is a win. DJs who buy used wax around London every week learn this sooner or later. The goal is a reliable play copy, not a miracle.
Perfecting Your Drying and Storage Routine
A record isn’t finished once it looks clean. If you dry it badly or store it carelessly, you can undo the whole job in one afternoon. Good post-clean handling is what locks in the benefit.
Drying needs space, clean air, and patience. Storage needs consistency. Most long-term record problems come from people getting one of those two parts wrong.
Drying without putting dust straight back on
After a wet clean, the record has to dry fully before it goes near the turntable or sleeve. Partially dried vinyl is a magnet for fresh contamination, and trapped moisture in a sleeve is asking for trouble.
Use this checklist:
- Stand the record upright to air dry: A dish rack or dedicated drying rack works well if it’s clean.
- Keep the drying area dust-free: Don’t leave it beside an open window or busy worktop.
- Use a clean microfibre cloth only if needed: Pat or lightly wipe. Don’t grind at the surface.
- Wait before sleeving: Dry means properly dry, not almost dry.
Clean records need a clean landing zone. If the rack, cloth, or shelf is dusty, the record will tell you.
Sleeves and handling matter more than people think
Once the record is dry, give it a proper home. Old paper inners shed fibres and often carry the very contamination you just removed. Anti-static inner sleeves are the easy upgrade here. Outer sleeves help too, especially if you care about keeping the jacket sharp and the shelf dust down.
Handling should stay disciplined after cleaning:
- Touch the edge and label area only
- Don’t leave records out after play
- Replace damaged inner sleeves
- Keep covers clean so dirt isn’t transferred back during handling
A beautifully cleaned record shoved into a grubby sleeve is a pointless exercise.
Store vertically and keep the room stable
Records should be stored upright, supported, and away from direct heat. Not leaning badly. Not stacked flat. Not tucked beside a radiator because the shelf looked convenient.
If you’re serious about long-term preservation, stable conditions matter. Broader storage guidance on what items need climate-controlled storage is useful for understanding why media collections suffer in rooms with heat swings, damp, and changing humidity. Records don’t need luxury treatment, but they do need a predictable environment.
A simple storage table helps keep the basics straight:
| Do | Don’t |
|---|---|
| Store records vertically | Stack them flat |
| Keep them away from radiators and direct sun | Leave them near heat sources |
| Use fresh inner sleeves after cleaning | Put them back in dirty paper inners |
| Keep shelving supportive and not overpacked | Cram records so tightly they scrape on removal |
The long game
Good storage is quiet work. Nobody notices it in the moment. You notice it later, when a record you bought years ago still plays clean, still sits flat, and still feels worth owning.
That’s true whether the collection lives in a front room, a spare bedroom, or a studio corner. Keep the routine simple, repeatable, and tidy. Even a modest setup can preserve records well if you stay consistent, much like any carefully maintained identity mark such as a clean Vinyl Gold logo asset that only works when it’s kept sharp and uncluttered.
If you care about records enough to clean them properly, you’ll probably care how they’re played too. VinylGold brings that same respect for sound to weddings, private parties, and events across South East London and Kent, with DJ sets built around timeless music, clean mixing, and proper attention to detail.